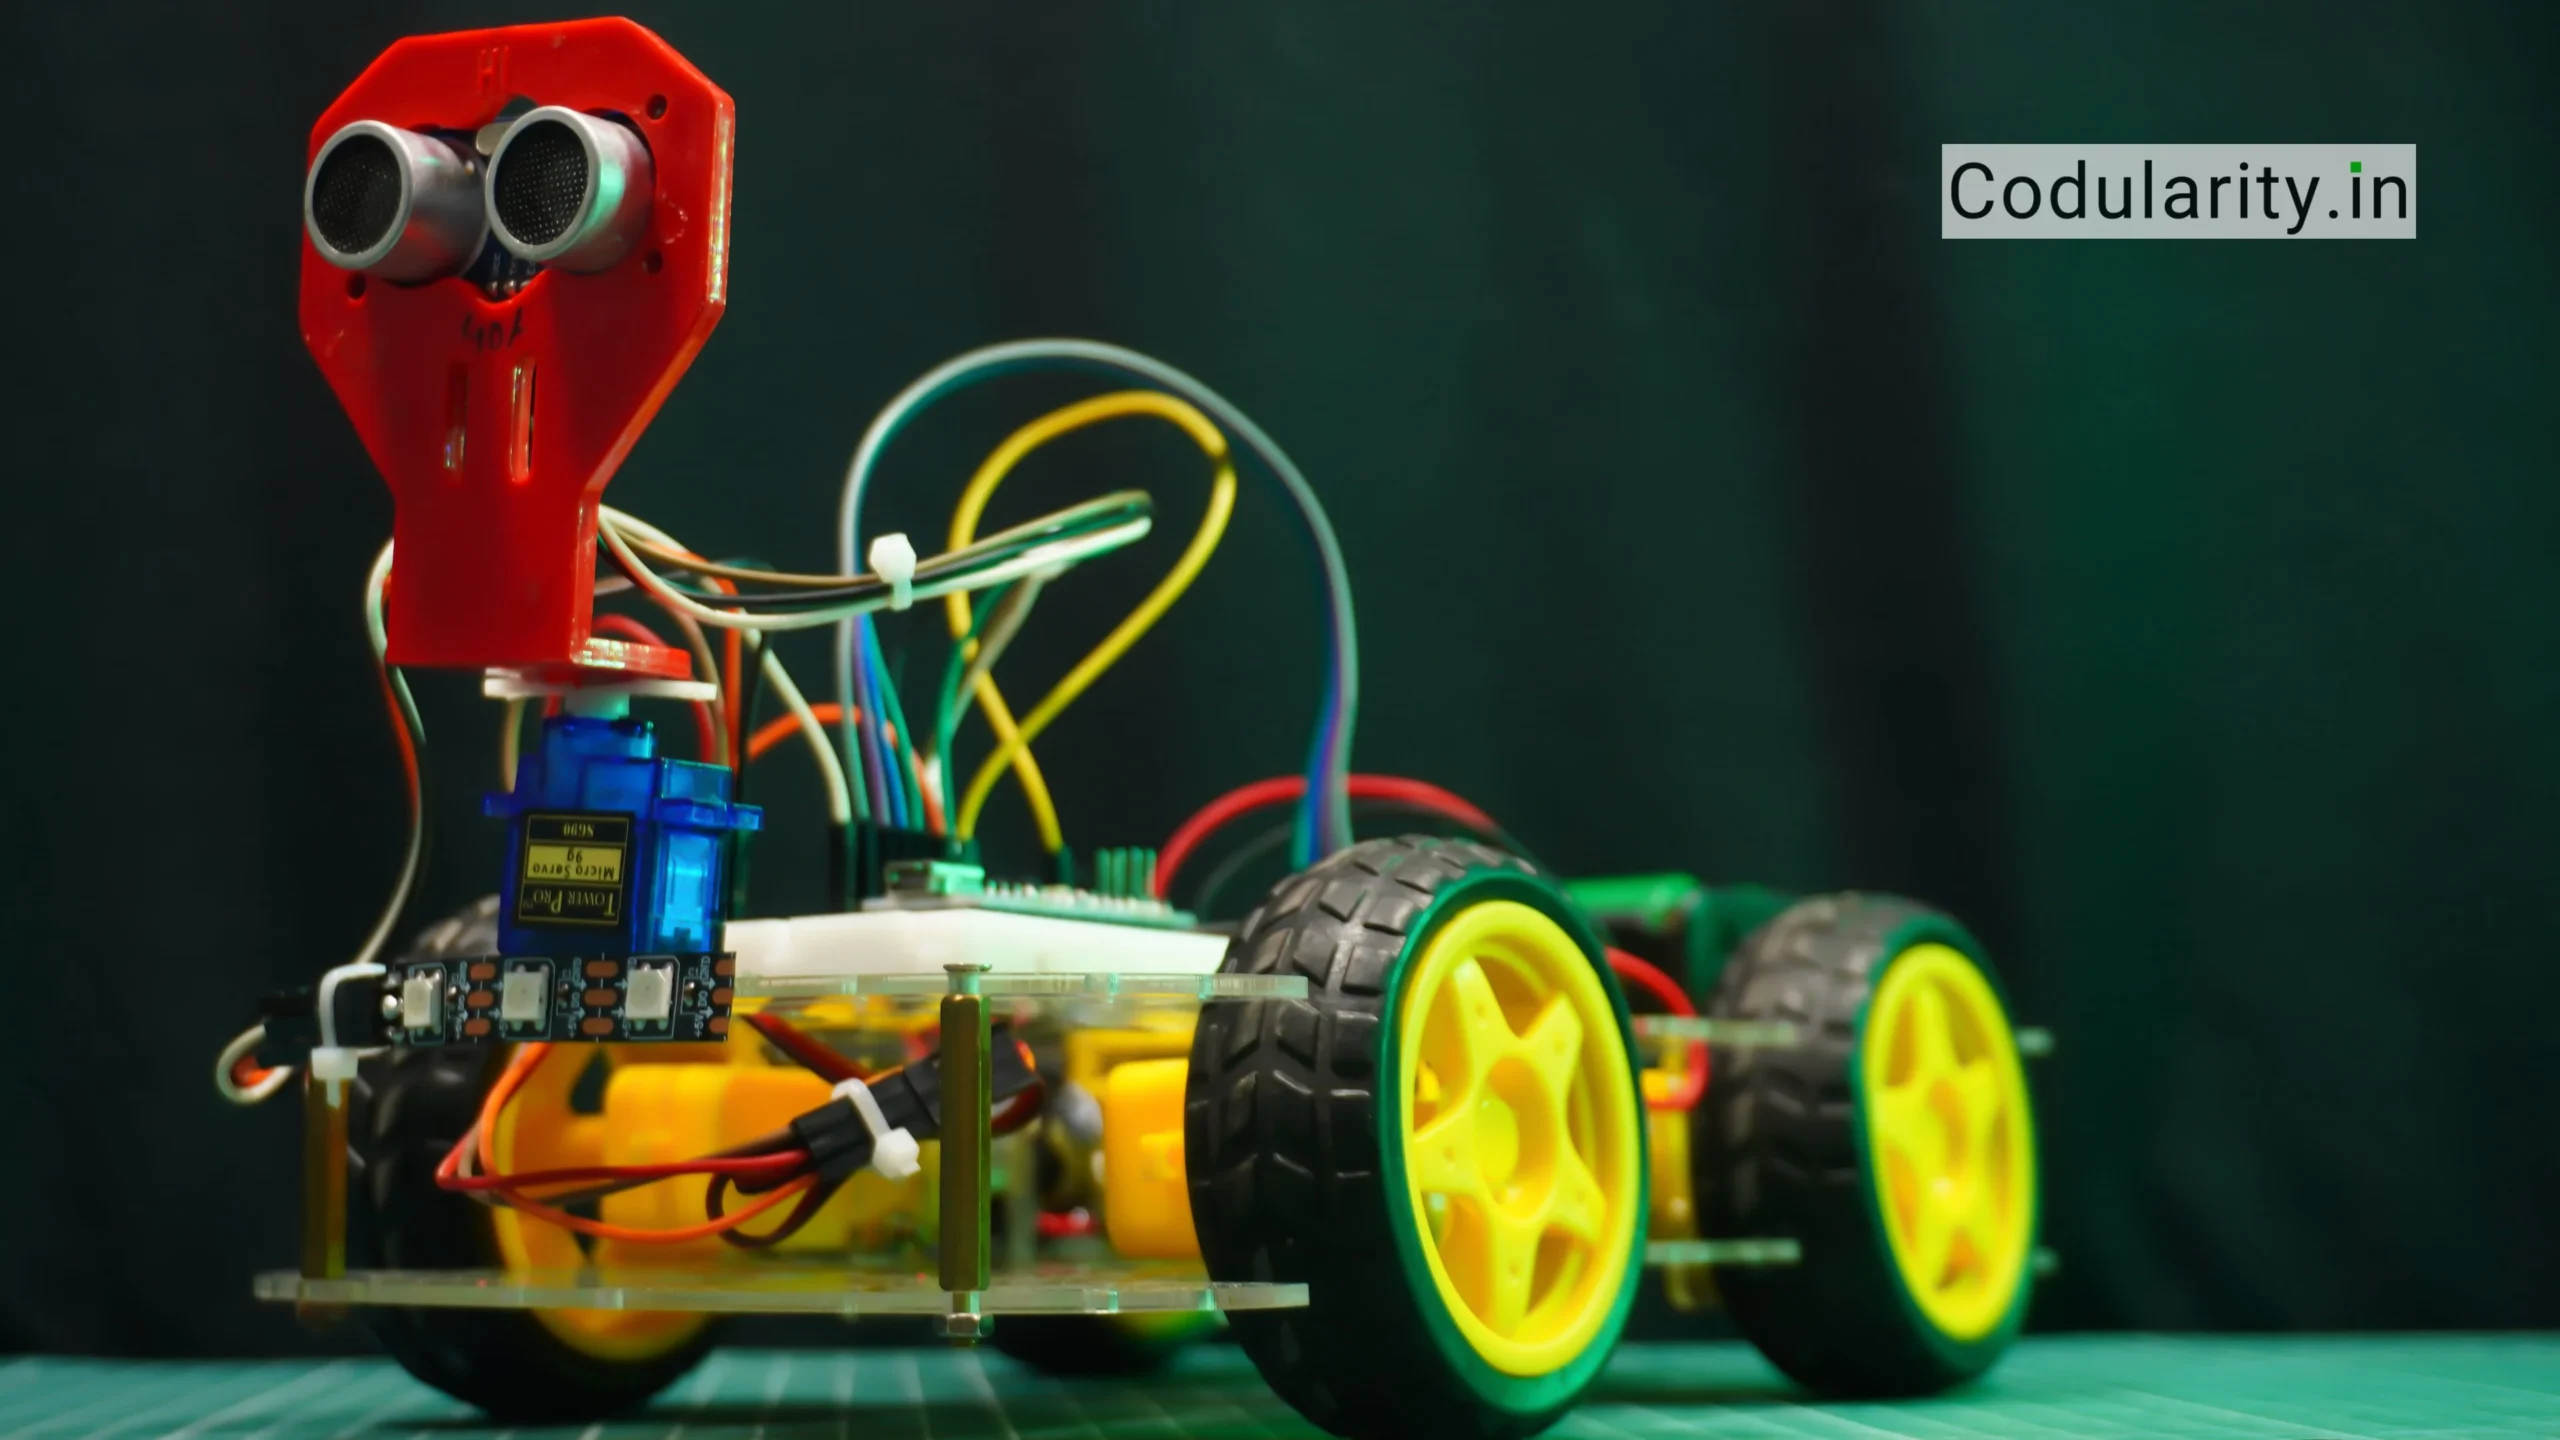
An obstacle avoiding robot is an autonomous robotic vehicle designed to detect and navigate around obstacles in its path without human intervention. Using Arduino as the brain of the robot, this project offers an accessible way for hobbyists, students, and beginners to explore robotics and automation principles. By integrating sensors such as ultrasonic or infrared, motors, and control algorithms, the robot can intelligently sense its surroundings and make real-time decisions to avoid collisions.
Building an obstacle avoiding robot not only enhances practical skills in electronics and programming but also opens doors to understanding real-world applications like home automation, manufacturing, and robotics education. This guide will take you through each step, from circuit design and components to coding and troubleshooting, making the learning process smooth and rewarding. Whether for education, experimentation, or prototyping, this project highlights the versatility and creativity Arduino empowers in modern robotics.
To know more about robotics please do follow this guide Robotics Project
Project Overview

The obstacle avoiding robot project revolves around creating a smart system that uses Arduino to process inputs from sensors and control motors to navigate spaces autonomously. Key components include the Arduino board, ultrasonic or IR sensors to detect obstacles, and motor drivers to manage movement. The objective is to build a cost-effective robot that demonstrates basic autonomous navigation concepts with practical real-world applications.
What is an Obstacle Avoiding Robot?
An obstacle avoiding robot is a type of autonomous robot that uses sensors to detect barriers and changes its path to avoid collisions. It typically operates in environments with unpredictable obstacles, relying on sensor feedback to steer around objects effectively.
Circuit Schematic

Components Required
- Arduino Uno or Arduino Nano board
- HC-SR04 ultrasonic sensor (or alternatives like infrared sensors)
- L298N motor driver module
- DC motors with wheels
- 7.2V Battery pack and holder
- Jumper wires and connectors
- Chassis or robot frame
Alternative affordable components can be used to tailor the build to budget or availability.
Understanding Components
A deep dive into each key component’s role and working principle enhances comprehension of the project.
Arduino Board: The Brain of the Robot

The Arduino microcontroller acts as the central processing unit of the robot. It reads inputs from sensors, processes the data based on the programmed logic, and sends control signals to the motor driver to move the robot. Its embedded microcontroller runs the obstacle avoidance algorithm, interpreting sensor signals to make real-time navigation decisions. The Arduino’s versatility, easy-to-use programming environment, and numerous I/O pins make it an ideal choice for DIY robotics projects.
Ultrasonic Sensor: Eyes of the Robot

The HC-SR04 ultrasonic sensor serves as the robot’s primary obstacle detection device. It emits high-frequency sound waves (ultrasound) and listens for the echo reflected by nearby objects. By calculating the time between emission and echo reception, it accurately measures the distance to obstacles in front of the robot. This distance data is crucial for timely decisions to stop, turn, or continue moving forward, allowing the robot to navigate around barriers without collision.
DC Motors: Mobility Providers

The two DC motors attached to wheels provide the mechanical movement capabilities of the robot. These motors convert electrical energy into rotational motion, allowing the robot to move forwards, backwards, and turn. Precise control over these motors is necessary for smooth and responsive navigation.
Motor Driver (L298N): Control Interface

The motor driver module acts as an interface between the low-power signals from the Arduino and the higher power needed by the DC motors. The L298N motor driver receives commands from the Arduino and regulates voltage and current to the motors, enabling direction and speed control through pulse-width modulation (PWM). Without this module, the Arduino cannot directly power the motors safely.
Power Supply: Energy Source

The power supply, typically a battery pack, provides the necessary electrical energy to run the Arduino, sensors, and motors. It ensures mobility by making the robot cordless. Choosing an appropriate power source with sufficient voltage and capacity is essential for consistent performance and longevity in operation.
Chassis and Mechanical Components: Structural Framework

The chassis forms the robot’s body, housing all electronic components and supporting the wheels and motors. A sturdy and lightweight chassis ensures stability during movement and protects sensitive parts from damage. Additional mechanical components like screws, mounts, and brackets help secure components and maintain alignment, crucial for accurate sensor readings and motor function.
Working Principle
The obstacle avoiding robot built with Arduino is designed to sense obstacles in its path and navigate around them autonomously using real-time sensor data and motor control. The decision-making process relies primarily on ultrasonic sensor inputs and pre-programmed logic executed by the Arduino microcontroller. Below is a stepwise explanation of the robot’s working principle and logic flow:
- Continuous Forward Movement:
The robot’s motors are initially activated to move the robot forward in a straight path. - Obstacle Detection via Ultrasonic Sensor:
The ultrasonic sensor emits high-frequency sound waves and measures the time taken for echoes to bounce back from objects ahead. This measurement is used to calculate the distance between the robot and any obstacle directly in front. - Distance Threshold Check:
If the sensor reports that an obstacle is within a pre-set minimum distance (e.g., 20 cm), the robot recognizes a potential collision. - Immediate Stop:
Upon detecting an obstacle closer than the threshold, the Arduino commands the motors to stop, preventing any collision. - Obstacle Scanning:
The robot then performs a scan by checking distances to the left and right sides (either by rotating the sensor or turning the robot slightly) to determine the clearer path. - Decision Logic for Turning:
- If the distance on the left is greater than on the right, the robot turns left by running the left motor forward and the right motor backward.
- Conversely, if the right side has more clearance, the robot turns right to avoid the obstacle.
- Resuming Forward Movement:
After turning, the robot resumes moving forward and repeats the sensing process to navigate continuously. - Handling Complex Obstacles:
If both sides are blocked, programmed logic can instruct the robot to reverse or rotate until a clear path is found.
Source Code
/*
 * Obstacle Avoiding Robot using Arduino, HC-SR04 Ultrasonic Sensor, and L298N Motor Driver
 * (C) 2025 codularity.in | All Rights Reserved.
 * Use, modify, or share this code with proper attribution.
 */

// Define motor pins for L298N Motor Driver
const int motorLeftForward  = 3;
const int motorLeftBackward = 4;
const int motorRightForward = 5;
const int motorRightBackward= 6;

// Define Ultrasonic Sensor pins
const int trigPin = 9;
const int echoPin = 10;

// Adjustable safe distance (in centimeters)
const int safeDistance = 20;

void setup() {
  // Motor pins as output
  pinMode(motorLeftForward, OUTPUT);
  pinMode(motorLeftBackward, OUTPUT);
  pinMode(motorRightForward, OUTPUT);
  pinMode(motorRightBackward, OUTPUT);

  // Ultrasonic pins
  pinMode(trigPin, OUTPUT);
  pinMode(echoPin, INPUT);

  // Serial Monitor for debugging
  Serial.begin(9600);

  // Stop motors at start
  stopMoving();
}

void loop() {
  int distance = getDistance();

  Serial.print("Distance: ");
  Serial.print(distance);
  Serial.println(" cm");

  if(distance > safeDistance) {
    moveForward();
  } else {
    stopMoving();
    delay(250);
    turnRight();  // or choose to turnLeft() randomly
    delay(400);
  }
  delay(50); // small pause for stability
}

// Function to measure distance using HC-SR04
int getDistance() {
  digitalWrite(trigPin, LOW);
  delayMicroseconds(2);
  digitalWrite(trigPin, HIGH);
  delayMicroseconds(10);
  digitalWrite(trigPin, LOW);

  long duration = pulseIn(echoPin, HIGH, 25000); // 25ms timeout for max range
  int distance = duration * 0.034 / 2;

  // If timeouts or bad readings, assign very close distance to trigger avoidance
  if (distance == 0) distance = 1;
  return distance;
}

// Motor movement functions
void moveForward() {
  digitalWrite(motorLeftForward, HIGH);
  digitalWrite(motorLeftBackward, LOW);
  digitalWrite(motorRightForward, HIGH);
  digitalWrite(motorRightBackward, LOW);
}

void moveBackward() {
  digitalWrite(motorLeftForward, LOW);
  digitalWrite(motorLeftBackward, HIGH);
  digitalWrite(motorRightForward, LOW);
  digitalWrite(motorRightBackward, HIGH);
}

void stopMoving() {
  digitalWrite(motorLeftForward, LOW);
  digitalWrite(motorLeftBackward, LOW);
  digitalWrite(motorRightForward, LOW);
  digitalWrite(motorRightBackward, LOW);
}

void turnLeft() {
  digitalWrite(motorLeftForward, LOW);
  digitalWrite(motorLeftBackward, HIGH);
  digitalWrite(motorRightForward, HIGH);
  digitalWrite(motorRightBackward, LOW);
}

void turnRight() {
  digitalWrite(motorLeftForward, HIGH);
  digitalWrite(motorLeftBackward, LOW);
  digitalWrite(motorRightForward, LOW);
  digitalWrite(motorRightBackward, HIGH);
}

/*
 * (C) 2025 codularity.in | You must retain this copyright notice in any use or reproduction.
*/Troubleshooting
Building and running an obstacle avoiding robot using Arduino can encounter common hardware and coding issues. Here’s a list of typical problems with quick fixes for smooth project execution:
1. Robot Not Moving at All
Causes:
- Power supply failure or low battery voltage.
- Incorrect wiring of motor driver or motors disconnected.
Fixes:
- Check battery charge and replace if needed.
- Verify all motor and driver connections match the circuit schematic.
2. Motors Make a Beeping Sound but Don’t Spin
Causes:
- Motor driver overheated or insufficient voltage supply.
- Faulty motor driver module.
Fixes:
- Let the motor driver cool down, ensure regulated 12V supply.
- Test with another motor driver if available.
3. Ultrasonic Sensor Not Detecting Obstacles Correctly
Causes:
- Poor sensor wiring or incorrect pin connections.
- Sensor damaged or obstructed.
Fixes:
- Recheck wiring according to the circuit diagram.
- Ensure no physical blockage on sensor; replace if faulty.
4. Robot Does Not Turn When Obstacle Detected
Causes:
- Coding logic errors or incorrect motor pin assignments.
- Motors wired to wrong motor driver outputs.
Fixes:
- Review and debug Arduino code, confirm pins in code match hardware.
- Swap motor wires or test motors individually.
5. Robot Keeps Spinning or Rotating Continuously
Causes:
- Sensor constantly detecting obstacle due to wrong threshold or interference.
- Loop logic causing continuous turn command.
Fixes:
- Adjust obstacle detection distance threshold in code.
- Add delay or state change conditions to prevent repetitive turns.
6. Inconsistent Sensor Readings in Serial Monitor
Causes:
- Electrical noise or power fluctuations.
- Ultrasonic sensor timing issues.
Fixes:
- Use separate power source or add capacitors for noise filtering.
- Add code delay between sensor readings.
7. Robot Moves Too Fast or Too Slow
Causes:
- PWM motor speed values improperly set in code.
- Mechanical issues like friction or motor wear.
Fixes:
- Tune motor speed values within safe ranges (1 to 255).
- Lubricate moving parts or replace faulty motors.
Testing
Testing your obstacle avoiding robot is a crucial step to ensure all components work harmoniously for smooth autonomous navigation. Follow this step-by-step guide to test sensor functionality, motor response, and full robot movement effectively:
Step 1: Power On and Visual Inspection
- Ensure all connections are secure and the battery is fully charged.
- Power on the Arduino and observe if any LEDs on the board or motor driver light up indicating power supply.
Step 2: Test Ultrasonic Sensor Functionality
- Open the Arduino Serial Monitor to view live distance readings.
- Place an obstacle at varying distances directly in front of the ultrasonic sensor.
- Confirm that the distance values change accordingly and are stable without erratic fluctuations.
Step 3: Motor Response Test
- Upload simple motor control code to the Arduino to spin each motor individually.
- Verify both motors rotate in the correct direction when activated.
- Check for any unusual noise or inconsistent motor speed indicating mechanical or wiring issues.
Step 4: Combined Sensor and Motor Test
- Run the full obstacle avoidance code.
- Observe if the robot moves forward when path is clear.
- Place an object within the sensor’s detection range and confirm the robot stops and turns away correctly.
Step 5: Environment Testing
- Test the robot in different environments with varying obstacle types (walls, boxes, irregular shapes).
- Adjust the sensor threshold distance and motor timings in code if the robot gets stuck or fails to avoid obstacles effectively.
Step 6: Troubleshoot Unexpected Behavior
- If the robot does not respond to obstacles properly, recheck wiring and code logic.
- Use Serial Monitor to debug sensor inputs and motor commands during operation.
- Inspect for loose connections, power issues, or hardware damage.
FAQs on Obstacle Avoiding Robot
Below is a set of common questions and answers typically asked about building and troubleshooting an obstacle avoiding robot using Arduino:
Q1: What is the effective detection range of the ultrasonic sensor used in this project?
A1: The HC-SR04 ultrasonic sensor typically detects obstacles from 2 cm up to about 4 meters under ideal conditions.
Q2: Can I use infrared sensors instead of ultrasonic for obstacle detection?
A2: Yes, infrared sensors can be used for shorter-range detection, but ultrasonic sensors provide better accuracy and longer range.
Q3: What power supply is recommended for running the Arduino robot?
A3: A 7.4V to 12V rechargeable Li-ion battery pack or equivalent with enough capacity to power the motors and Arduino is ideal.
Q4: How can I customize the code to change obstacle detection distance or robot behavior?
A4: Modify the distance threshold values and motor control delay timings in the Arduino code to adjust sensitivity and movement speed.
Q5: What are common symptoms if the robot’s motors do not respond?
A5: Check power connections, ensure motor driver pins are correctly wired, and verify that the code correctly controls motor pins.
Q6: Can this project be extended with additional sensors or capabilities?
A6: Yes, you can enhance the robot by adding GPS, line-following sensors, or Bluetooth modules for remote control.
Q7: Why does the ultrasonic sensor sometimes give zero or inconsistent readings?
A7: This could be due to electrical noise, sensor misalignment, or objects poorly reflecting sound waves; verifying wiring and adding delays in the code can help reduce this issue.
Q8: How do I troubleshoot if the robot gets stuck turning or keeps rotating without moving forward?
A8: Review the sensor reading logic and turning conditions in the code, ensure sensor data is accurate, and test motor response individually to detect control issues.
Summary
This Arduino obstacle avoiding robot project is a hands-on way to learn robotics, sensor integration, and programming basics. The robot autonomously detects obstacles using ultrasonic sensors and navigates safely by controlling motors accordingly. It builds practical skills in electronics and embedded systems while demonstrating real-world automation applications. Future improvements can include additional sensors, wireless control, and smarter navigation algorithms, making it a versatile platform for learning and innovation.